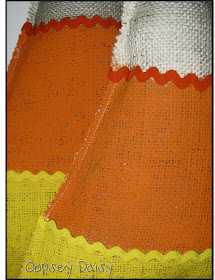
In case you missed my post at Naptime Crafters, here is my tutorial for burlap candy corn!
I LOVE burlap and LOVE candy corn, so I knew the combination had to be great! Come along, and I'll show you how I made these two beauties!
I started out by cutting a rough candy corn shape out of burlap. You will need a front and back for each candy corn. I decided to make a large candy corn and a smaller candy corn.
Next, I painted each piece of burlap--fronts and backs--with acrylic paint. I just eyeballed where I wanted to paint, and it turned out fine! I decided to leave the top part plain instead of painting it white. I let these dry overnight.
Next, I pinned the candy corn together, wrong sides together.
I left more than an inch in seam allowance. I sewed almost all the way around the candy corn, but I left a large opening in the bottom.
I stuffed the candy corn, using a pencil to help punch out the corners completely. Then I sewed up the opening!
I decided to use pinking shears to cut around the seams. I love the effect!
I looked at these for a solid week, knowing that they needed something to jazz them up! I decided on some ricrac! I just hot-glued the ricrac around the candy corn right in between paint layers.
Don't they make a nice back drop for my spider topiary? (Even before the ricrac!) You can check out my spider topiary tutorial today at Moo Moo's & Tutus, where I am guest posting for the talented Daphne's blogiversary bash!
I love Halloween crafts! I am having way too much fun with fall decor. I think I now have more decorations than my tiny apartment can handle!


Too cute, Alison!! The addition of the ric rac is exactly what these needed. Love that you painted the burlap, too!!
ReplyDeleteI recently came across your blog and I LOVE IT! You are very creative and crafty!! These candy corns are super cute. I want to make some. I have a dumb question though, where do you buy burlap?
ReplyDeleteThese are realllly cute! I love the ric rac. It is perfect! So great Alison!
ReplyDeleteGorgeous and easy to make. Thanks for the idea.
ReplyDeleteYoli from Apron Senorita
* new follower *
I like anything burlap! Awesome idea they look wonderful!!
ReplyDeleteI've givin you an award :)
http://create-it-fab.blogspot.com/2010/10/my-first.html
Great idea! Lookin' fabulous!
ReplyDeleteThese are adorable! Such a clever idea!
ReplyDeleteSo cute - I love those!
ReplyDeleteI shared them on my TT&J FB page and linked to you :)
xox
Jen
These are so stinking cute! Love it.
ReplyDeleteThese are very cool and you make them look so easy! Thanks for sharing.
ReplyDeleteHow cute to make a spider topiary!
ReplyDeleteI really like these, you did a great job. It was so clever to paint the burlap.
ReplyDeleteThe burlap works PERFECTLY for these pillows! LOVE THEM! Thanks for linking up to Thrilling Thursday @ Paisley Passions. Hope to see you again next week :)
ReplyDelete~Lori S.
Love it with the ric rac!!!!!
ReplyDeleteHi there!!! I'm your newest follower from the weekend linky:) I love finding new blogs and yours is lovely:) You can find me at www.bouffeebambini.blogspot.com
ReplyDeleteThis is adorable!!
I LOVE these! I made similar ones last year out of felt - I just love love love fake food, especially around the holidays!
ReplyDeleteSo happy to see you again at A Crafty Soiree! Is there anything you make that isn't so stinkin' cute? I mean everything, absolutely everything is fantastic! I love the rickrack, you're right they give them just the finishing touch they needed. Thanks for sharing and looking forward to seeing you next time too:)
ReplyDeleteSuper cute decorating idea!
ReplyDelete